Don’t want to pay tons of money for a professional camera, all of its equipment, and everything else you’re expected to purchase? Discover these photography hacks, and learn how you can become, even with just your smartphone, a gateway to professional quality photos.
Photography with your Smartphone
Now that smartphones have such high capabilities for photo capture, many people have been able to take up photography. Everyone carries around their smartphones these days, whereas a large digital SLR may not be your go to grab when you’re running off to a concert, party, or hike.
The great thing? We’ve got a list of things you can do to your smartphone to help you take more professional pictures, even with just that!
- Macro Lens - Ever wanted to take a real up close and personal shot with just your smartphone? Sure, they’ve got crazy gadgets you can pay for to get a macro attachment for things like your iphone but instead, try this free way to take a macro shot whenever you want to.
- Take a small droplet of water and place it right on the lens of your smartphone camera. If it is small enough it won’t roll off. Then take the up close picture. You will be amazed at the kinds of results you get.
- Underwater Container - The kinds of cases you need to buy to get your smartphone waterproofed and able to take photos underwater are incredibly expensive. But if you’re just looking to take a shot or two in shallow water we’ve got an inexpensive alternative for you.
- Place your smartphone in a drinking glass, then you can place the glass in the water as deep as it can go before filling the glass with water. This allows you to get underwater shots without actually taking your phone underwater.
-
Apps
The other thing that is incredibly handy when it comes to smartphones are the millions of apps that are created every day just for you to do things like make your pictures look fantastic. The difficulty comes in trying to decipher and sift through all the terrible unusable apps and find the gems. So here you go, we’ve done that for you!
- FREE
- FXCamera - (also available for android) This app lets you record your voice when taking a picture, giving the picture a recorded caption if you will. It may not be the best app for photogs, but if you’re looking to make your photography more of a life journal this could be a great addition to your apps.
- Camera360 - (also available for android) If you’re looking to make a few edits to your photo right there on your phone after taking the picture, Camera360 is a great app that allows you to do just that; it includes filters, lighting changes, and more. Plus, if you hold your finger down on the image after making corrections it will show you a “Before” and “After” of that photo.
- Paid
- Average Camera Pro ($0.99) - This app allows for capturing long exposures with a smartphone. It automatically takes a number of pictures over time and averages them together to get the best picture in a low-light situation. Just remember to use a tripod when taking pictures like these.
- AntiCrop ($0.99) - This app is much like the awareness tool found in photoshop, it allows you to elongate your photos, capturing more of what you thought you had, but have come to find was cropped out of the picture when you took it.
- TouchRetouch ($0.99) - (alsoavailable for Android) Get rid of unwanted items in your photos by using things like spot healing brushes and surrounding awareness tools.
- Afterlight ($0.99) - (also available for Android) Discover all kinds of filters, textures, and crops in this app.
- Manual ($1.99) - Take control of exposure, shutter speed, ISO, white balance, and more, so that it’s you taking the shots and not your phone’s automatic settings.
Make Your Own Equipment
Whether you’re shooting with a smartphone, a point and shoot, or a digital SLR, you’re going to want to learn these photography hacks, because they will teach you how you can use items found laying around the house to enhance your photos and start shooting like a pro.
- Bokeh - bokeh refers to the way light becomes unfocused in the background. There are ways to turn these circles of blurred light into shaped works of art, and many professional photographers are doing it every day. Here’s what you need to do it yourself!
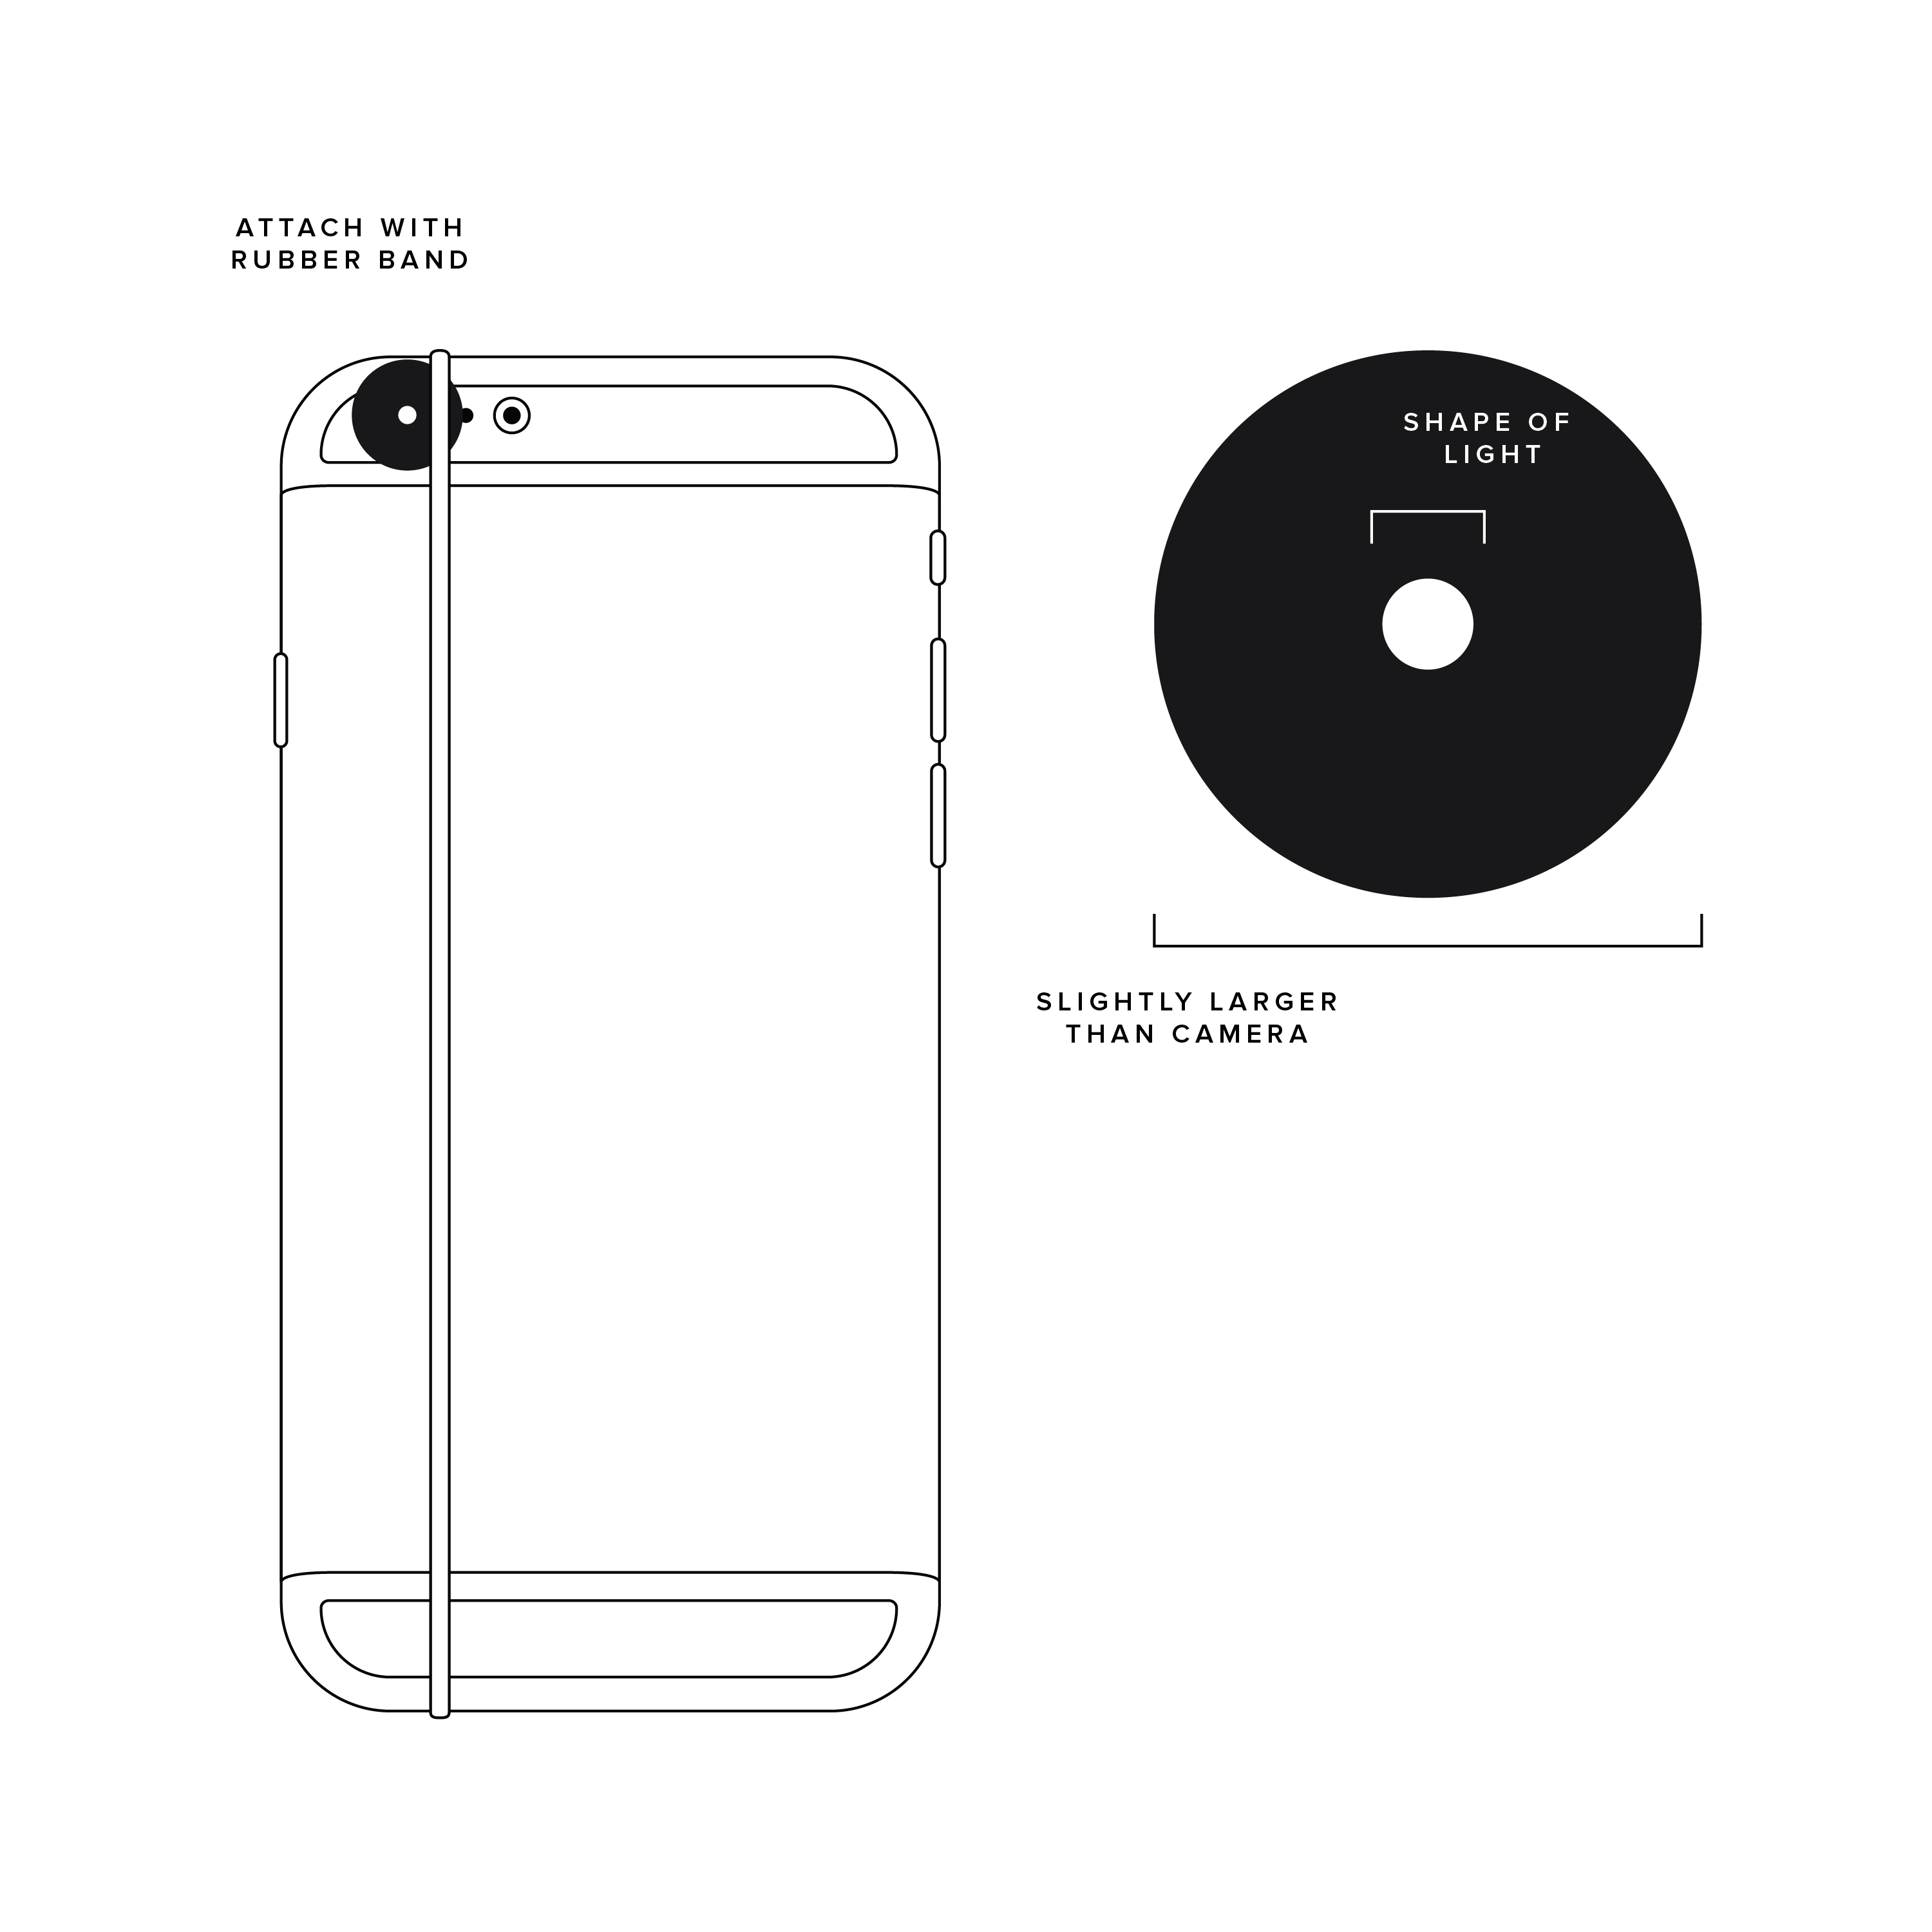
- Cut a circle a little larger than the size of your lens into a black piece of cardboard or thick paper.
- Cut out the shape you’d like your bokeh to be into this circle of cardboard.
- Use a rubber band to attach the black circle to the front of your lens…now when you take unfocused pictures of light, they will be in the shape you cut from your makeshift bokeh lens.
- Tripod - Tripods help you steady your camera so that you can get crisp, clear shots. It also helps in low-light situations when your shutter speed may have to be slowed in order to get enough light for a decent picture. But you don’t have to go out and buy a ridiculously expensive tripod. Here’s what you’ll need to create your own version of a tripod:
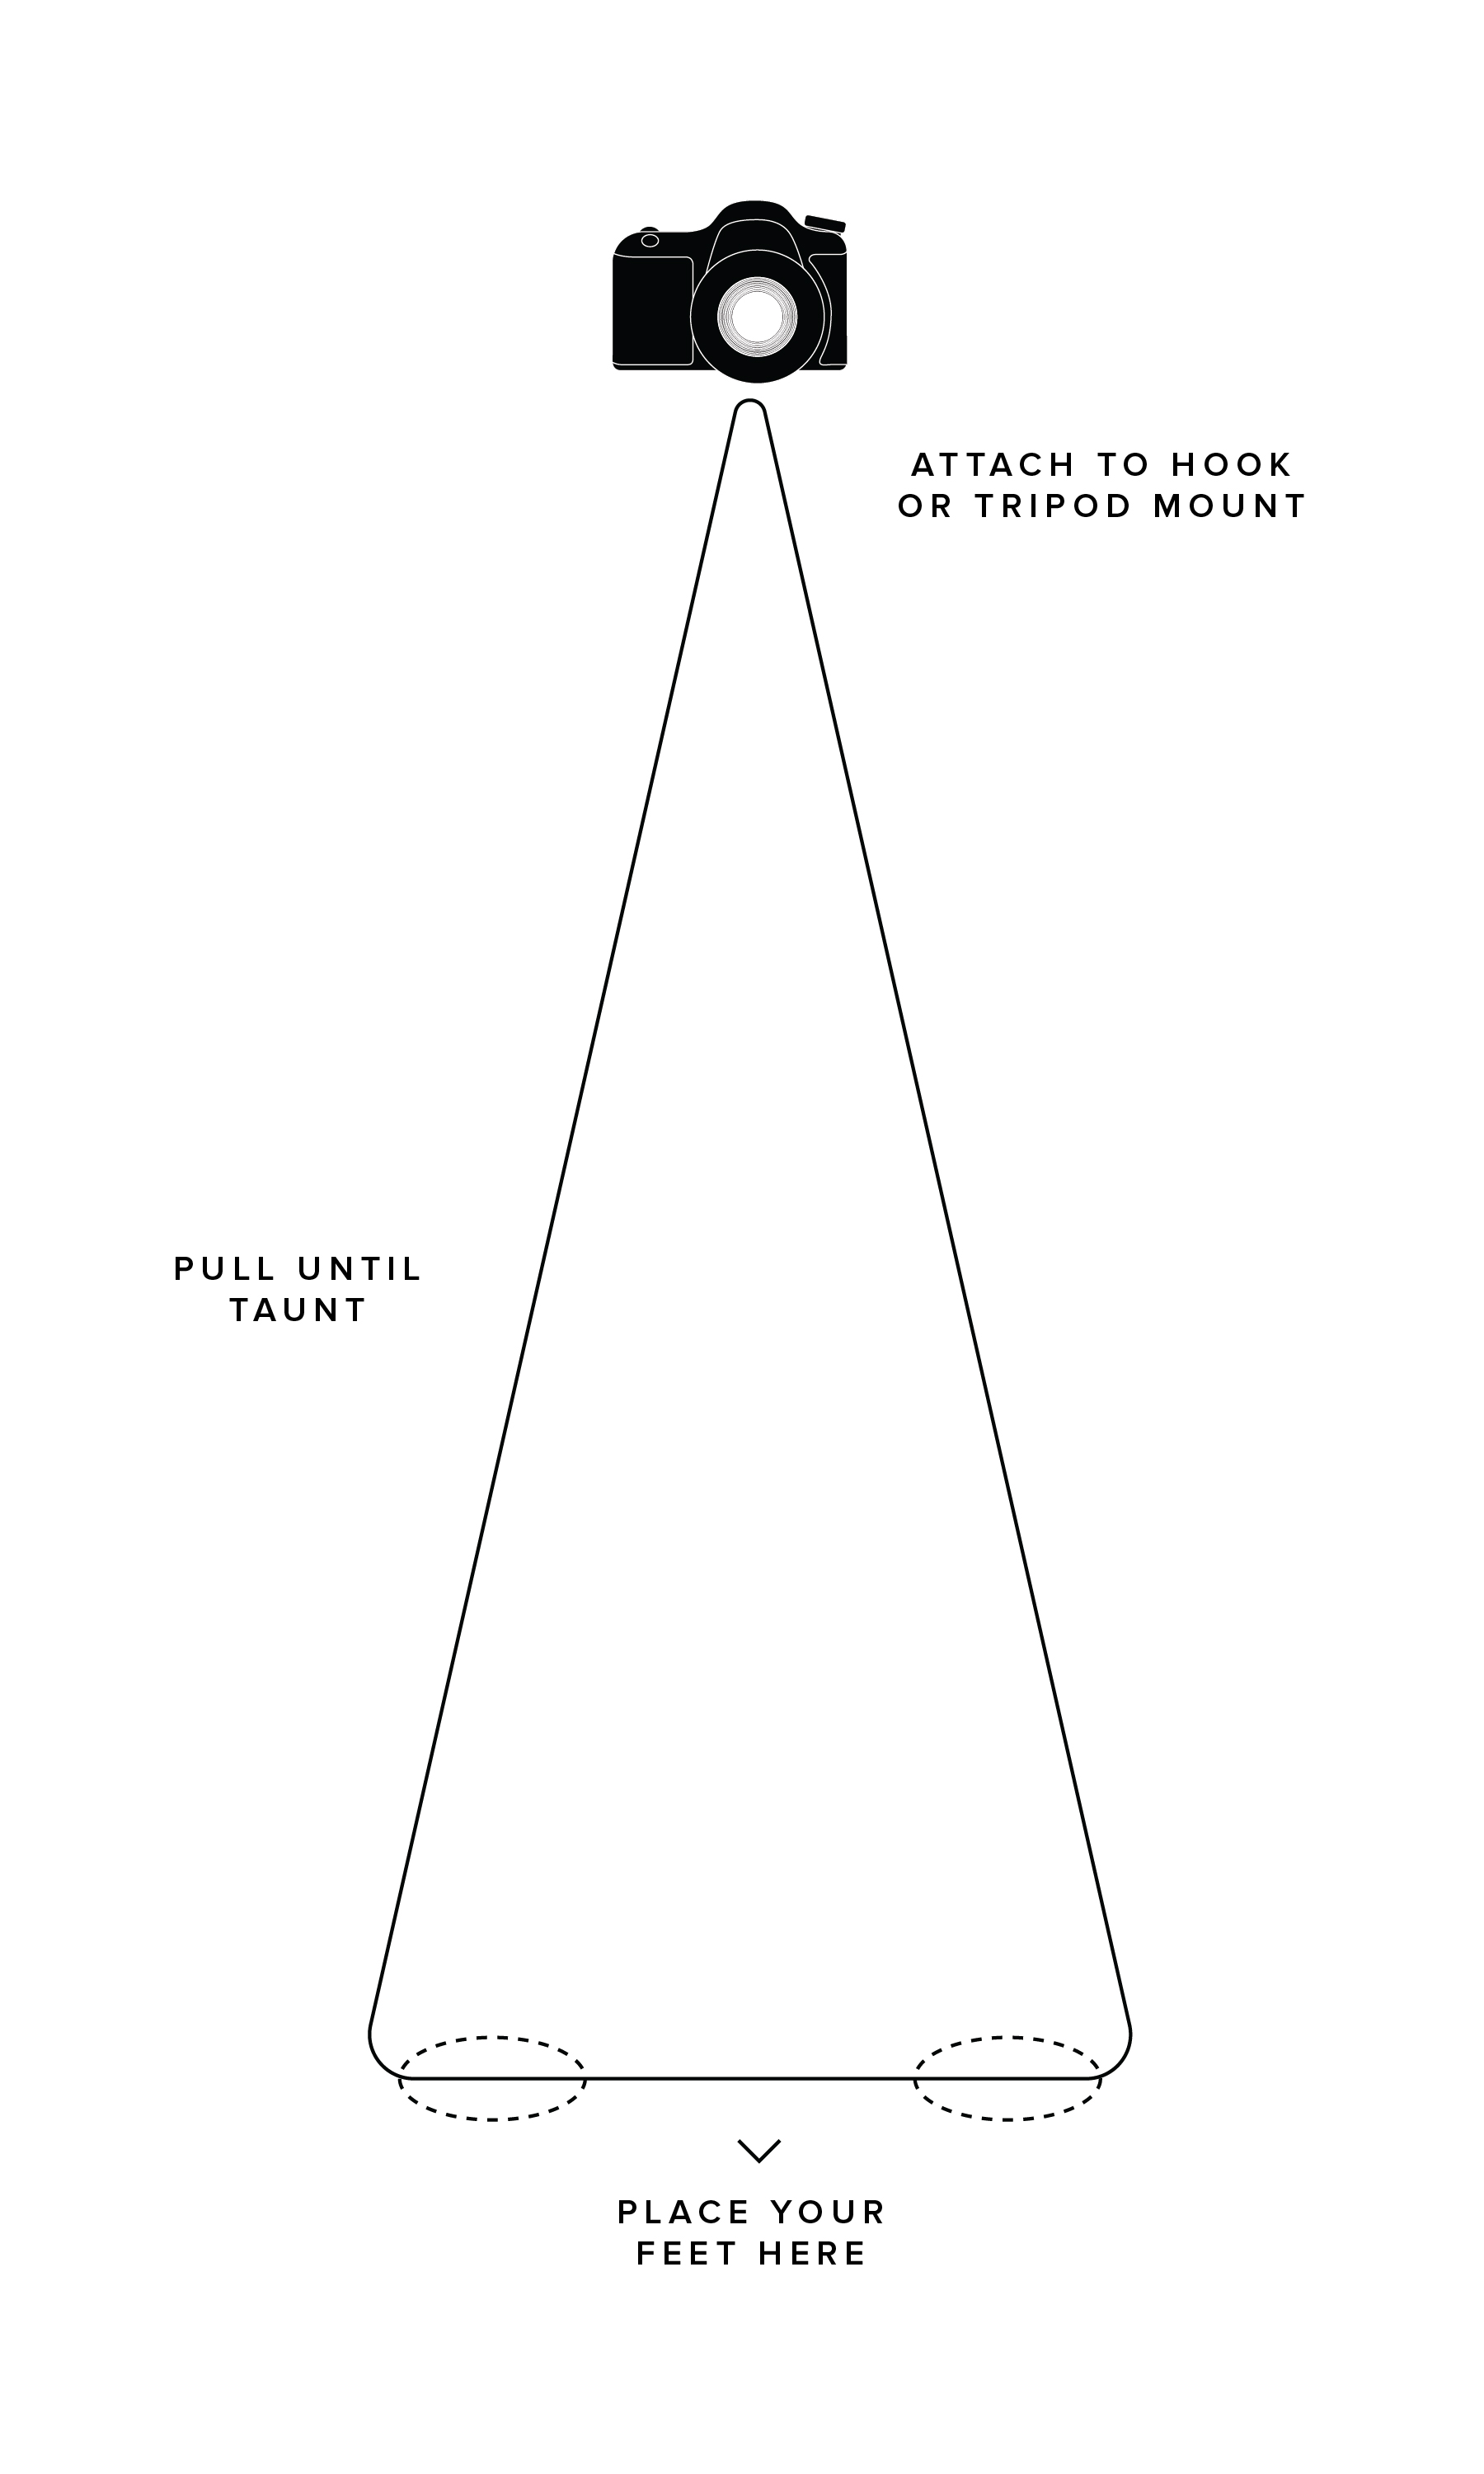
- Take a tripod mount or a screw in hook and string a long piece of sturdy string through it.
- Tie a knot with the string, connecting the two ends so that the string is one continuous loop.
- Step your feet into the loop and pull the rope taught upward; you now have a tripod made from the triangle in the rope going from foot, to foot, to camera.
- Moving Timelapse - Timelapses can be done through a video or a photo. This particular idea looks best when creating a video. Time lapses capture what happens in a specific place over a certain period of time, but what if your timelapse could capture what happens in a 360 degree radius? This is all you need to make it happen!
- If you have a GoPro, this one is easy. Simply mount the GoPro to an egg timer, set the egg timer, and let the video role.
- If you’re using a different camera, it may get a little trickier to mount it to an egg timer; consider using things like a tripod mount and duct tape.
- Product Photos - If you sell things on ebay, etsy, or amazon, you know how important it is to take professional looking product photos. Here is a super simple way to get that professional look with a household item:
- Use a black tile -- that’s it! Place your product on one end of the tile and make sure to get the reflection of the product captured in the picture as well.
- If you can take these photos in an area that has a black background, say a black bed sheet for instance, the products will look even better!
- Fun Lighting - In case you’re looking for something to spice up your pictures and enlighten your subject, here’s a unique idea:
- Buy a tube light - it turns out they come with a great bulb!
- Use the bulb in creative ways while photographing your subject.
- Homemade Studio - If you enjoy taking portraits, you may wish you had your own in-home studio, but these are practically impossible and super expensive to create, right? Not necessarily. Instead, check out how to create your own version with just a few items:
- Hang a curtain bar up with white walls as a background.
- Place on this curtain bar a role of seamless white paper; use clamps to hold the paper in place.
- Pull the paper down and out so that there is a nice sheet from the ceiling to the floor and then some (you want your subjects to be able to sit on the paper as well).
- Place underneath the paper that is on the floor a large piece of wood, this will help keep the paper from wrinkling and looking terrible in your photos.
- Backdrops - Not a fan of the simple white studio? That’s ok, there are hundreds of DIY backdrops that make any picture stand out:
- String marshmallows, yeah you heard me right, onto long pieces of string and hang them from the ceiling. Let your subjects intertwine themselves in the marshmallow vines. This actually almost looks like cotton balls in photos and can give a very elegant feeling to even bridal shots.

- Pin a few lines of twine horizontally across your wall, using clothes pins, attach a few leaves, vines, ferns, etc. This can bring an evergreen look to your photos, or a fall look with the bright pop of red and orange leaves.

- Purchase a few great colors of tissue paper and cut out circles of all different sizes. Using some elmer’s glue and a sponge, apply the tissue paper circles to a white poster board and place this behind products for an interesting product photo.

- and many more here!
So go ahead, feel free to dump out a few craft boxes and discover what you can make to turn any photo into a professional photo. Then share what you’ve created with us! Whether you followed our example and got some great shots using our hacks, or found your own fun way to make pictures look great, we want to hear what you’ve done! Happy photographing!